The quick answer
To screen record on iPhone, open Control Center, tap the Record button, and wait for the three-second countdown. To record your voice too, touch and hold the Record button and turn the microphone on first. The recording is saved to Photos.
To turn that recording into a video people will enjoy watching, open it in an editor that can trim, frame and annotate it. With Creavit Studio for iPhone, you can also record directly from the app: the take opens as a project, ready for zooms, captions, your camera and a background.
| Control Center | Creavit Studio | |
| Records any app | Yes | Yes, with Apple's screen broadcast |
| Microphone | Touch and hold Record, then turn it on | Turn it on in the broadcast sheet |
| Where the recording goes | Photos | A new editable project |
| Zoom, captions, camera, background | No | Yes |
| Automatic tap markers and zooms | No | With Detect taps on |
Before you record
A clean recording saves editing time later.
- Silence notifications. Turn on a Focus such as Do Not Disturb so banners do not appear in the video.
- Prepare the screen. Close what you will not show, sign in to the app beforehand, and use example data instead of personal information.
- Rehearse once. Know the path you will tap through. A recording with fewer detours needs fewer cuts.
- Check storage and battery. Screen recordings grow quickly at high resolution.
- Stop screen mirroring. Apple notes that you cannot screen record and use screen mirroring at the same time. Some apps also block audio or video recording.
Option 1: Record with Control Center
This is Apple's built-in method, described in its screen recording support article.
- Swipe down from the top-right corner of the screen to open Control Center.
- To record sound, touch and hold the gray Record button and tap Microphone. Otherwise, just tap Record.
- Wait for the three-second countdown, then leave Control Center and use your app.
- To stop, tap the recording indicator at the top of the screen and tap Stop, or open Control Center and tap the red Record button.
- Find the recording in Photos.
If the Record button is not in Control Center, add it from the Control Center controls first. To edit the result in Creavit Studio, tap the import button and choose the video from Photos.
Option 2: Record with Creavit Studio
Recording from the app skips the import step and can add tap markers for you.
- Optional: turn on Detect taps. In the app's recording settings, Detect taps finds tap moments from device motion while you record and adds tap markers and zooms. Run the one-time calibration with real touches for reliable detection.
- Tap Record. In the system sheet, make sure Creavit Studio is selected. Turn the microphone on if you want to narrate.
- Tap Start Broadcast. After the countdown, go to the Home Screen and use any app. A red indicator shows that recording is on.
- Stop. Tap the red indicator in the status bar, or the recording button in Control Center, and stop the broadcast.
- Return to Creavit Studio. The recording opens as a new project automatically.
Step 1: Trim and split
Start with the cut, before any styling.
- Trim the beginning where you open Control Center or start the broadcast, and the end where you stop it.
- Split around waits such as loading screens, and delete the middle part.
- Reorder clips if the story reads better another way, and add a transition on a cut when a hard cut feels abrupt.
Step 2: Choose the canvas and frame the screen
Pick the shape of the video for where you will post it: 9:16 for Reels, Shorts and TikTok, 16:9 for YouTube and websites, 1:1, 4:3 or 3:4 for feeds. Then make the screen look intentional:
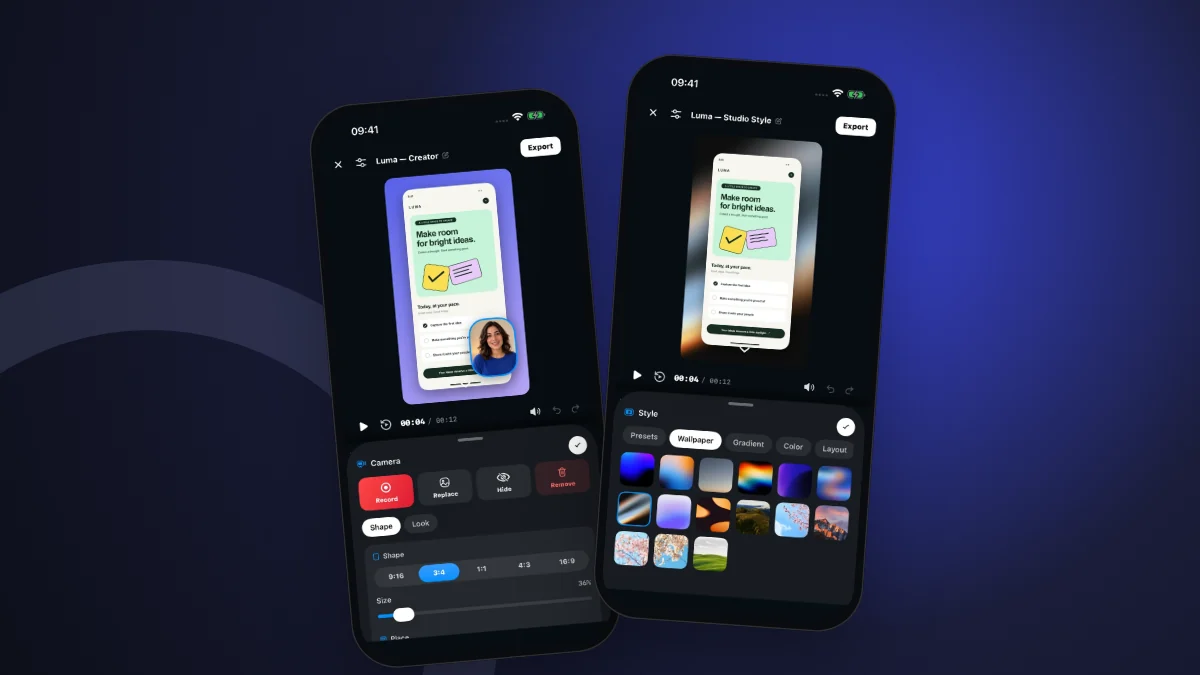
- Add a wallpaper, gradient or solid color behind the recording.
- Use padding, rounded corners and a shadow so the screen does not touch the edges.
- For an app demo, place the recording in a flat device frame or a real 3D iPhone model, and choose an angle such as Front, Left, Right or Hero.
Step 3: Guide attention
Phone screens are small, especially when the video is watched on another phone.
- Zoom on the detail that matters: a button, a number, a result. Use Standard to push the whole frame in, or Liquid to show a glass lens over one area while the rest stays visible. Our iPhone zoom guide compares both.
- Tap highlights show where you touched. Move or delete markers that do not help.
- Smooth scroll keeps your pauses but removes jerks and small accidental back-scrolls.
One zoom for one idea is a good rule. Hold it long enough to read, and release it before the next action.
Step 4: Add captions and your camera
Many people watch with the sound off. If you narrated, open Captions, choose the spoken language and a starting style, and generate. Correct names and product terms in Edit transcript, then place the captions where they do not cover the interface. The captions on iPhone guide covers styles and placement.
To appear in the video, open Camera › Record camera: the recording plays while the front camera records you in sync. iOS pauses the camera while you use other apps, so this separate pass is the most reliable way to add yourself. You can also add a video or image from Photos, or turn on Camera in Picture in Picture in the recording settings to capture a camera window as part of the screen, as long as that window stays visible.
Step 5: Export
Tap Export and save to Photos or share directly. The free plan exports 720p at 30 fps with a small watermark. Creavit Pro exports 1080p, 2K or 4K at 24, 30 or 60 fps without the watermark. Watch the exported file once with sound and once muted before posting.
Troubleshooting
- No sound in the recording. The microphone was off in the broadcast sheet or Control Center. Turn it on before starting. Some apps do not allow audio capture.
- The recording stopped early. Low storage or an interruption such as a call can end a broadcast. Free up space and record in shorter takes if needed.
- The camera stopped during the screen recording. iOS stops the camera when its Picture in Picture window is hidden. Keep the window visible, or add the camera afterward with Camera › Record camera.
- Tap markers are in the wrong places. Run the tap calibration again, and remove or move the markers in the editor.
Next steps
Download Creavit Studio for iPhone to try the workflow on your next recording. If you edit on a computer, the Mac app can also record a USB-connected iPhone.